Cycling with your dog is a fantastic way to provide physical exercise and mental stimulation. One of the most popular tools for this activity is the Springer Dog Exerciser, a safe and efficient way to bike with your dog. However, Springer Dog Exerciser installation must be done correctly to ensure both rider and pet safety. In this article, we’ll walk through the installation process, include maintenance tips, and link to helpful resources and studies.

Why Proper Springer Dog Exerciser Installation Matters
Before we dive into the how-to, it’s important to understand why a correct installation is crucial. Improper setup can lead to imbalance, potential injury, or even detachment while in motion. According to the American Veterinary Medical Association (AVMA.org), pet injuries during exercise are often preventable with the right equipment setup and supervision.
What’s Included in the Springer Dog Exerciser Kit?
The Springer Dog Exerciser kit typically includes:
- The main Springer arm
- Safety release mechanism
- Clamp and bolts
- Hex keys and washers
- Installation instructions
If you are missing any of these parts, it’s advisable to contact the manufacturer or visit SpringerAmerica to order replacements.
Tools You’ll Need
Most of the tools required for installation are included in the kit. However, having the following on hand can make the process smoother:
- 13mm wrench or adjustable wrench
- Allen keys (usually 5mm and 6mm)
- Screwdriver
- Loctite or thread locker (optional but useful for preventing loosening)
Step-by-Step Springer Dog Exerciser Installation Guide
Let’s break down the process into manageable steps. This will help ensure the device is securely attached and functions properly.
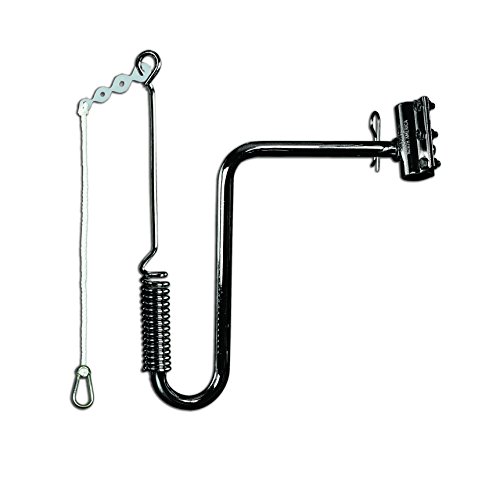
1. Step 1
Decide which inserts to use:
Step 2
Assemble clamps over the insert(s):
Let the opening in the insert(s) point straight forward. Place both sides of clamp over the insert(s) and bolt together as shown in illustration. Please see to it that the clamps are fastened high enough.
Step 3
Assemble spring to S-tube:
There are three ‘bumps’ on the outer end of the S-tube. They act as a thread guide for the coil spring. Screw the spring about 1 inch down on the S-tube. Leave the eye on top in position as shown in drawing (the end of the spring wire at the eye should point straight in towards the bike.
Step 4
Attaching the S-tube to the clamp:
Mount the S-tube onto the bolt, and secure it by inserting the locking pin through the hole in the S-tube and the bolt.
Step 5
Assemble the cord, clip and safety releases:
Thread the outer hole at the wide end of the safety release on the top of the spring. (a little force may be necessary) Thread the cord through the hole in the bottom of the plastic hook and tie a simple knot at the end of it. Pull this knot back into the ‘transverse’ hole in the base of the hook. Thread the loose end of the cord through hole 1, 2 or 3 of the safety release according to the following guidelines:
Hole 1: All children, or adults weighing less than 110 lbs. (50kg) or small dogs weighing less than 44 lbs. (20kg).
Hole 2: Adults weighing over 110 lbs. (50kg) and dogs weighing more than 44 lbs. (20kg).
Hole 3: Strong, skilled adult cyclists and with large, strong eager-to-pull dogs.
Note: Use hole 2 or 3 only if all requirements for that hole are met. Make a simple knot at the end of the cord so it does not slip out of the safety release. The total length of the cord, plastic hook and safety release should be about 12 – 16 inches or 30 – 40 cm (shortest for large dogs.)
Check from time to time that none of the nuts are loose.
Step 6
Take a test ride.
If the heel of your shoe hits the horizontal part of the S-tube, loosen the three front nuts so the clamps can be “wiggled” up until the heel of your shoe is clear of the S-tube in all pedal positions.
If the heel of your shoe clears the S-tube by more than 1 inch in all pedal positions, the clamps should be wiggled down.

Test the Installation Before Riding
Look for signs of discomfort or instability. Make adjustments if necessary. Test the tension on the leash and ensure the safety release can detach under pressure.
According to guidance from the Centers for Disease Control and Prevention (CDC.gov), practicing controlled environments is key when introducing new equipment to animals.
Maintenance Tips for Long-Term Use
Like any mechanical device, the Springer Dog Exerciser requires occasional maintenance.
- Check the bolts and clamp weekly to make sure nothing has loosened.
- Inspect the spring mechanism for signs of wear.
- Clean after muddy rides, especially around the clamp and leash attachment.
- Lubricate moving parts monthly to reduce friction and prolong life.
These simple actions ensure that your Springer lasts longer and continues to function safely.
Can the Springer Dog Exerciser Be Installed on All Bike Types?
Generally, the Springer is compatible with most standard adult bicycles. However, there are some exceptions:
- Full-suspension mountain bikes may have no straight bar to mount the clamp.
- Electric bikes with battery packs on the seat post may obstruct installation.
- Kids’ bikes or bikes with very small frames are often too compact.
If you’re unsure whether your bike is suitable, consult your manufacturer or local bike shop.
Safety Considerations for Springer Use
Even with proper Springer Dog Exerciser installation, safety should always be a top priority.
- Use a helmet when biking.
- Start slow and in a quiet area to allow your dog to get used to the setup.
- Watch the weather—hot pavements can burn paw pads.
- Avoid heavy traffic areas until both you and your dog are confident.
The ASPCA.org recommends early training and familiarization sessions for any new form of pet exercise, especially involving speed and movement.
Benefits of Springer for You and Your Dog
The Springer isn’t just a leash—it’s a full biking companion system.
- Provides consistent exercise for high-energy dogs
- Keeps dogs secure and at a safe distance
- Reduces pulling through the shock-absorbing spring
- Helps owners stay active with their pets
According to a study from the National Institutes of Health (NIH.gov), active dogs are healthier, more obedient, and tend to live longer. That’s a compelling reason to ensure the installation is done right.
Conclusion
Installing the Springer Dog Exerciser correctly is a vital first step toward safe and enjoyable cycling with your dog. By following this guide, using high-quality tools, and practicing good safety habits, you can give your dog the outdoor adventure they crave—while staying in control and keeping both of you safe. Don’t skip the steps, double-check your work, and enjoy the ride!